Saturday, February 19, 2011

Scallop Shirt and Bloomers

Here is my first attempt at kids clothing, I do have a new niece on the way, due in June, but this is size 12 months, and I can't bring myself to give it away.... I may keep it for my hope chest.... I really made this outfit to see how well I do with patterns, and well the whole process. This project seemed so daunting at first - but, baby steps lead up to making baby clothes apparently.

I got both pieces of fabric, again, from my favorite store - Marshalls - in the remnant bin (as much as you can shove in a shopping bag for 8$, pretty sweet eh?) and they go so great together I will have to make more outfits from the remaining fabric! 

 I didn't have a real t-shirt pattern, so I took a onesie pattern and traced it on to freezer paper (I got ideas from a tutorial HERE, but didn't follow it to a T, I was experimenting). After tracing, I  added an A-line shape at the bottom, I ended the length just past where the leg cut outs started on the onsie pattern.
I got the idea for the Scalloped neckline from HERE, I loved the idea, there is a great tutorial for it HERE (that Jess from Craftiness is not optional is amazing!), I did mine a bit different (Jess' is much nicer - someday maybe I will be that good!).

  The shirt felt difficult at first, mostly the sleeves. I was winging it to see what I was capable of, and the first time you make something is generally the most difficult,  so I look forward to the next outfit I make!

  I already had a pattern for bloomers (seriously, one of the easiest things I have ever made).
I added the bows and pockets just as a cute-sie detail to tie the outfit together.

If your a Mama, Mama-to-be, Grand-mama or Awesome Auntie (like me)- Try it out, it's not as hard as I would of expected, and it was so much fun to make.

Happy Sewing!
-Courtney Soleil

Thursday, February 17, 2011

Family Room Makeover Project.....

After much ridiculousness and a really long time in Fabricland trying to decide on "the perfect fabric" for my living room, here is what my Mum and I finally decided on:
The bottom one is for throw pillows for my sectional couch (it matches really well, adds texture!) and the middle one is to add a valance and tie backs to my boring cream ikea curtains (they were left here by the previous owners, and well I can't pass up free...). On top is just a cheap fabric to use as a lining for the valance, but I kinda like it! Mum and I have been getting amazing deals on fabric lately, the pillow fabric was on for buy 1 get 3 free (worked out to around 3$ a meter), and the valance fabric was buy 1 get 2 free (worked out to about 4$ a meter)... I can't remember what the lining was on for.... but it was even cheaper - we even got the pillow forms buy one get one free.
The colours go really well with my family room, the sectional is a cream chenille with a hue of green to it, and the throw pillows that came with it have the same colour as the sectional and then a goldish colour, grey-green and goldy green, very much the colours of both above fabrics. I have a cream and light grey area rug, cream curtains, green walls (just a couple shades lighter than the valance fabric) and a beautiful fireplace. Though I always prefer silver or pewter over gold fixtures, the fireplace has gold trim and we got a free table set thats gold and pewter and a tall spider lamp in gold - I can't get away from it. Oddly enough, with having a greyish green colour in the couch and grey in the rug, and a few pewter accents - like on the table and a fire poker set, gold and pewter are getting along.
I promise when it is all finished I will post pics of the whole room too - as long as it doesn't all go horribly wrong... ( ha ha ha?).
I am also working on tons of other projects, and I still have a ton more fabric pics to post, like I mentioned further up, Mum and I got some great fabric deals.... can you say remnant bin? One deal we got was buy 1 get 5 free from the remnant/bolt ends bin, and most pieces were over a meter, such a variety too, I can't sew them fast enough - I am literally running out of space to keep them all!

I will update with more soon, promise!
Happy Sewing!
-Courtney Soleil

Friday, February 11, 2011

Baby Changing Pad

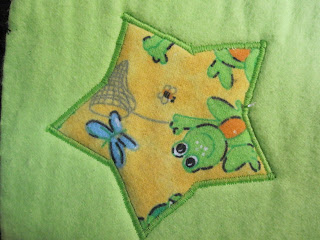
I just had to share this project!!! Since I haven't been able to do much for a while, but the very least I can do is sew, right? For this Baby Changing Pad I used Jill's (from Home Made By Jill) tutorial found here HERE, I used a great froggie print and lime green flannel (my sister Farrah's favorite colour), Iron-On Laminate (I bought mine is a role at Marshalls), 2 layers fusible fleece, some black binding and belting and here is what I ended up with:
 This really is a great project for just about anyone to try, don't be scared! Makes a great shower gift, and would be fun to personalize, this one is exactly my sisters style.
 The Iron-On Laminate allowed me to take the perfect print and make it durable and wipe-able, perfect for this application.
 I love how this turned out, and it was SO easy to make too.
 I was going to leave the outside plain green, but decided this would be much more adorable, and it is for my amazing sister after all.
I happened to have some belting, I tend to save little pieces of stuff like that to re use, this came off a backpack that eventually got tossed.

Happy Sewing!
-Courtney Soleil

Sunday, February 6, 2011

Sewing Room

Today I am going to show off a couple things in my sewing room, my Mum has been here and has helped me organize!
----
Sewing Machine
Just before christmas I moved the sewing room from the smallest room in the house to the spare room (double the size!). I figured my sewing gets used a heck of a lot more than the spare bed (people stay over maybe 2-3 times a year?) so why waste all that space, well Kevy agreed. Not long after the room swap, my sweetie bought me a beautiful new sewing machine, so far I am just enamored by it...


I kept the old Janome for emergencies, but I am a Brother follower for life now. I did a lot of research on sewing machines before we bought this one, I knew I wanted something to do basic embroidery, mainly monogramming, and this one just fit the bill - It does everything I want and more. The only problem is being in Canada, we get overcharged for EVERYTHING, a basic Babylock (same company as Brother) with less features was over 1000$ on sale here and this machine was under 400$ new off ebay with shipping from Alabama! I have to say, apart from duties, ordering from the states is the way to go! Thank you Ken's Sewing & Vacuum Center!
 ----
Sewing Table
I got many things for christmas this year from my sweetie pie, some weren't wrapped and he doesn't see them as gifts, but to me the little things he does for me are the greatest gifts of all. One thing in paticular just made my year... He works hard all day then comes home and builds me a sewing table in the perfect height... 

Kevin even painted the feet blue (my favorite colour!)

 He took our old kitchen table (it was the pereft size, even has a leaf for bigger projects) and added an 8 3/4" base so it's the right height for cutting.
 The base acts as a great shelf for my rubbermaid containers - I keeps extra fabric, batting, clothing to repurposed and other misc. sewing things. Now I fit my scraps bin and garbage can there too. I am so fortunate to have such a sweet and supportive man.
-----
A Little Bit of Organization....

 My sewing station - Machine, dollar store drawer unit with machine essentials (feet, bobbins, tools, etc.),   sewing caddy with pin cusion and thread bag (more on that later), but I found that idea on Craftiness Is Not Optional (I love Jess' blog) and she used This Tutorial from Sew Mama Sew!. Ok so I didn't actually use the tutorial I just guessed and I think it turned out pretty good! I swapped sides for the thread bag because it just worked better for me.
 I like to have my fabrics out where I can see them for inspiration, the really pretty ones anyways...
I found the original Idea for this ribbon organizer over at The Cottage Mama's blog. It would have been better if I could have found a pant hanger as widely spaced as Cottage Mama's hanger, but this is as close I could get, still works, just have to space them a rung apart (darn it).

 Here are my buttons, some more ribbon and my beautiful Sewing encyclopedias (my Mum is the best, she got them for me from a used bookstore in BC)
The button and ribbon jars were also inspired by The Cottage Mama's great organizing ideas. I bought a 1lb button bag from Wal Mart ans sorted them by colour and size (and sets) in small baggies then put them in jars, and from Fabricland my Mum and I got super cheap ribbon spools, too small for my ribbon hanger so I put them in a small jar so you can see all the colours. These jars were a set and were 5$ at Wal Mart (STEAL!!)

I will post more intermittently on my great room, promise - until then...
Happy Sewing! 
-Courtney Soleil

Dog Coats - Refashioned from Human Coats

I'M BACK! I know it has been forever since I posted - I apologize but I was having too much fun recovering from surgery (ok, recovering yes, fun no...). Now I am back and thought I better post some things I have been working on.

Dudley's Coat

Since Alberta is pretty much the coldest place I have ever been I figured my dogs think so too (you'd think they'd be used to it..), so I made them both doggy coats! I made Dudley's coat first because well, he basically sits outside and shivers all winter - and Sam would rather lay in a snow bank instead of her bed.
I have bought countless coats for Dudley and they never quite fit right and when the dogs play the cheaply made coats don't stand up long - at 40-90$ a coat I can't afford to keep replacing them!
I took one of my old coats and an old fleece zip sweater, fitted it to Dudley (I didn't want it to gape and have him pee on it...), then used the fleece for the bottom and the winter jacket on the top.


 Under the chest, nice and snug.
 I even made leg covers so he is as covered up as can be without limiting his movement (wouldn't want to hinder his squirrel chasing abilities....). I couldn't make a belly strap because boy dog anatomy makes it difficult and I didn't want the back of the coat flying up - the solution was leg straps that velcro together on the inside of the thighs. Voila!
 I put his name on it in case he gets lost (not likely, but its cute..).
Ok, this last one is mainly because he is so darn adorable, but you can see I used velcro on the neck to keep the zipper from slipping down.
----------------------------------------------------------
Samantha's Coat
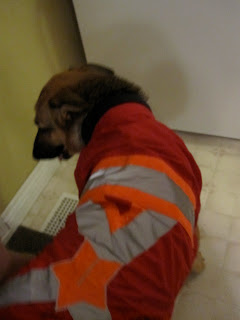
With Sam's coat I didn't need to make it super warm, just needed more of a wind breaker/water repeller. It was important I make Sam's coat more of a "working" coat, we are going to put Sam in training for Search and Rescue (hopefully) and we wanted her to have something functional.
 I bought a adult large sized rain coat from Value Village (cost a whole 3$ !) and refashioned it to fit Sam. I sewed up the original arm holes (they were in the wrong spot...) and made new ones, they are large because Sam runs like lightning and I had to put function first. I used black bias binding to finish the arm holes off. I was able to use the original zipper and snaps and just had to make a rear cut out for her back legs, I also was able to include the original pockets and hide-able hood (rolls in to the collar).
 I took a cheap reflective vest I had on hand and used some pieces of reflective tape on the back.
 (isn't she beautiful?????)
 To correct the angle and have a nice finish I took a scrap of the orange vest and appliqued it on.
 It honestly fits so great! I was very happy with how it turned out. Don't worry, now that I have an embroidery machine I will be putting her name on the coat too, when I will do I will make another post.
The reflective tape is awesome, you can litaraly see it reflect an extreme distance from a light source - I am considering putting some on Dudley's coat too for when I take him running... we will see. 

Feel free to email me if you have any questions.
Happy Sewing and Repurposing! 
-Courtney Soleil