Monday, May 2, 2011

Family Room Curtains.... Finally.


My family room bow window has been nekkid since christmas for a little while. While my Mum was here over winter we took down the boring Ikea curtains, washed them and then they sat folded in my sewing room forever, waiting to be rejuvenated.  
I  love to re-purpose, so when we moved in to our house and the previous owners had left some boring adequate Ikea curtains behind, I decided I would keep them until I found something I liked better.

This is what the curtains used to look like:

...and now:
Don't mind Kevin's lap top in the corner, he looked comfy on the couch so I didn't want to move him...

Yes, curtains, not too exciting, I know. I am happy with them because I was able to re-purpose something FREE in to something pretty, and remember my fabric from my post back in february? There is the green and gold stripe in all it's glory. Green is not my favorite colour, but, it is a close third and it goes with the room.. plus it only cost me about 8$ for the transformation.

I made tie-backs to match, I also bought some plain green of the same fabric, and good thing I did because I used everything but a 8"x12" piece of the valance fabric... and I wanted wide tie-backs.

****
So here is a brief "How To" 
(I don't want to insult anyones intelligence)
For an 11' span, I used 4 standard size Ikea curtain panels, and sewed 2 of them together for each side of the window. I had 2 meters of of valance fabric (you will need the same amount of lining) and another 1/4 meter  of a coordinating (or of the same fabric if you like) for the tie backs.

Here is the underside of the valance, I lined them with a thin and cheap polyester, just to give stability.
 As you can see above, I have a wooden dowel as a curtain rod, mainly because its an 11' span and I couldn't find a long enough curtain rod or one stable enough not to bow in the middle.
I really didn't want to have to hang 2 dowels just to have a valance, and I didn't make the curtains in the rod pocket style because the rod holders would make the curtain hang funny.
My solution was to attach the valance to the curtains as is.

Take your finished valance  and face good side of valance to the back side (side toward the window) of the curtain and sew a straight stitch along and it will look like the picture above....

When you put up your curtains flip the valance over to the front and it will be nice and finished looking.

 ...the back of the curtains still look like that...

Now you have your valance attached... easy as can be.
So pretty and shiny....

***

Below is a picture my Mum took of the old windows... it was kind of a surprise, the boys changed the windows while I was at work so I only have mid-reno photos. We used to have 3 windows on the left, we filled in the side window (it looked at our neighbors anyway) and made a bigger hole for the new bow window.

...much better now, I think.
I love my Bow window, Kevin along with my Dad and his Dad, installed the windows last year, and the bow window was a mis-size so it was practically free for us. Another one of my favorite windows in the house, you can lay on the couch and watch the world go by.

Another project down, 9 million more to go.


 Happy Sewing!
-Courtney Soleil


Thursday, April 21, 2011

Fabric fabric and even more fabric....

I found a cool a cool way to organize my fabric - it totally makes sense too! It seems many quilters know of this trick to fabric organization but I would have never known and been cutting up uneven cardboard pieces forever!

Use comic book backboards - who woulda' thunk it eh? I saw the idea here and if you read reviews on amazon apparently I am behind the times - in case you are behind with me here is your update in to 21st century sewing....
(It's only fitting I store comic book fabric on comic book boards right?)
You just fold your fabric in half (like most come off the large bolt at the store already) and then fold in top fold to center of fabric then selvage to center also. The boards are roughly 7x10" - I measured my folded fabric to between 9" and 9 1/4" so you'd see to board's ends once rolled.
Storing 1 to 6 or 7 meters is your range for these boards (they are like a thicker card-stock), and lower that end number if its a thicker fabric - I only used this storage method for my thinner fabrics and my baby quilting flannels - it just seemed to work the best.

 Because I do should but don't have time my share of quilting also, I have many beautiful fabrics with 1/2 a meter or less (some fat quarters also) and I wanted to be able to store them all together, but less than a 3/4 meter just doesnt wrap around as well. I took my trusty quilting ruler and cut some in half lengthwise, it worked perfectly!

I then folded in the raw end and pinned in place as above. I stood my mini fabric bolts up on a shelf... if that's how you will be storing them I suggest poking the pin in to the card also, it keeps the fabric from sliding down the board and bunching.

Don't they look oh so pretty and organized, much better than before. My "super mini" bolts are at the top to the left - they could be organized better (colour wise) but some of them are in order of quilt projects.

.....and just to keep it real, here is the rest of the shelves, they are in need of a mass organization too... all in time - as my in-laws always say "Home wasn't built in a day".

Happy Organizing!
-Courtney Soleil
   

Thursday, April 14, 2011

Baking Frenzy

I was on a baking frenzy last week - we don't have kids (yet), so baking is something I keep to a minimum or else Kevin insists I am trying to make him fat... he says he can't not eat baked goods because they are so tasty so if I don't make them then he doesn't have a dilemma... Last week I had 2 really good excuses to bake!

1. We had a work potluck so I got to bake a billion cupcakes:
The pink ones are Duncan Hines Confetti Cake Mix with Vanilla Buttercream Frosting, I used the same recipe as the Lemon Frosting, but omitted the lemony things and added vanilla instead.
They were a hit at work!

2. Kevin's parents came over for "Tea and Cake" - being of English background I am VERY familiar with both tea and cake... I made Kevin's favorite, Banana nut muffins:

I have the recipe hand written on a piece of paper, and I have used it since I moved from home, so don't ask me where it came from originally... Here it is:
***
Banana Nut Muffins
1 1/4 cup brown sugar
1/2 cup butter
2 eggs
2 large crushed old bananas
1/2 cup buttermilk or heavy whip cream
2 tsp vanilla
2 cups flour
1/2 cup quick oats
1 tsp baking soda
1 tsp baking powder
1 tsp salt
1 cup chopped walnuts or pecans (if desired)
1 cup chocolate chips (if desired)

Instructions: Mix first 6 ingredients then add in remaining ingredients. Bake at 350 degrees for 50-60mins if in cake form or  20-30mins for 12 muffins.
***

I also made a Lemon Cake


mmmmm... who doesn't love a nice cup of tea with a side of Lemon cake? This cake is a little dryer than expected, but it goes great with tea or coffee.

Happy Baking!
-Courtney Soleil

Wednesday, April 13, 2011

Chaise Lounge cover

Yesterday we talked about the Snazzy Dog Bed I made, now what to do about cleaning my couch and keeping it nice? The dogs love their bed but in getting used to it, they briefly sneak up on to the couch and most often the chaise lounge.
My initial solution was to steam clean my couch - well, I am cheap  economical, and paying 200$ to have my couch steam cleaned every so often was not an option. Then I thought I will just vacuum it really well and often - not happening, I work full time and I have a hard time keeping my house in order as it is. I DO vacuum my couch as often as I can though, Kevin bought me the most beautiful vacuum (I love my Dyson) which does make it easier. But vacuuming alone didn't get it thoroughly clean - since I love to live dangerously I actually removed my cushion covers and WASHED them, in the WASHING MACHINE - I know, I'm sure you are cringing this very moment - they came out like new, maybe better than new, and they smell soooo good.  Nearly all the cushion covers can be removed, except the chaise lounge bottom, so my solution:

A Cover!
I had a old vintage bed spread my Mum had given me ages ago, the very first one she ever bought actually. I love the texture and the cream colour - usually I have cream curtains so the match it perfect.

 ...unfortunately it had huge holes all along one end and was very frayed from time and use. I have always loved it and used it to cover another couch prior, but it really looked rough. I took the better side of the bed spread and laid it on my chaise lounge pinned where it need to be cut or stitched and made a custom cover - it doesn't shift and it is so soft and easy to wash. I made a couple throw pillows to tie it in and voila!
I am blogging from that very spot right now!

Happy Sewing!
-Courtney Soleil

Tuesday, April 12, 2011

Snazziest Dog Bed... Ever

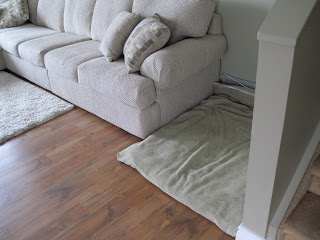
I have been trying to kick my pooches off our beautiful family room couch for eons, nothing seemed to work.  I tried putting throw pillows everywhere so they couldn't lay comfortably and would be forced to go to their beds in the basement - not happening - they figured out they could nose the pillows on to the floor or snuggle in between them (which they liked EVEN BETTER!).  I tried locking them in their basement room, dudley ate through the door.... seriously. We replaced the door with a new one, but they can still get out... I do like having them roam the house freely, I feel safer that way - They alert us to intruders and any passing sinister looking cats or squirrels (Dudley is convinced they are evil... who are we to disagree?). The  dogs have earned their "right" to roam the house - they never have accidents anymore, they let us know when they have to  go out, they don't chew or destroy anything and they don't make a sound (except Dudley does snore...), so why not let them protect the house? Well, my poor sanity couch is suffering.

I love my furry babies, I really really really do, but I really really really love my couch too. Kevin and I bought this couch when we moved in, and I still haven't seen one I like as much. It's over stuffed and soft and light coloured.... it's pretty much perfect in every way - except for the fact it's covered in dog hair the majority of the time and it shows the dirt. Clearly my pups like to be upstairs closer to us, and close to the front door so here was my last attempt at saving my couch for doggy destruction:

A Snazzy Dog Bed
I love the colour, it actually looks way more green in person, goes really well with the walls and the green from the throw pillows from my couch (see my couch subtly sneaking in the side of the picture?)

Fabricland had a sale on all their upholstery fabric, and this fabric was very similar feel to my couch (which the dogs love) and it doesn't show the fur - super easy to wash and vacuum. Here's a close up, both really super soft chenille, just different patterns: 
Couch                                            Dog Bed

HOW TO:
To make the dog bed, you need about 4 meters of upholstery fabric (for those that work in yards, a meter is roughly 40" wide). I made this like a pillowcase (very very simple) and did a zipper closure at one end.

Finished mine ended up 40"x60" and it fits 2 large breed dogs perfectly (for me it filled a void of space beside my stairs too)

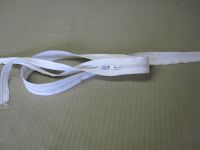
I bought a twin duvet from Walmart (included pillows) for 15$ on sale and used it as the soft center - you could use fiber fill or batting or foam, but this was cheap and available.  I actually forgot to buy a zipper so I took the zipper off the quilt bag:


Worked GREAT!
Hey I think I just took cheap to a new level - I even kept the clear vinyl bag to make I-spy bags in the future. 

The furry babies seem to really like their new bed! 

Now what to do about cleaning my couch?
More on that tomorrow!

Happy Sewing!
-Courtney Soleil


Monday, March 28, 2011

Samosas and Muffins!

I  had an excellent thifting day recently and in one of the $1.99 bags of random items was this brand new dough press:
So adorable, it even came with some recipe ideas

Just place a rolled piece of dough on each side, stuff with filling and smush closed.

You can make all kinds of things with this thing! Pizza pockets, pie pockets, and of course....
SAMOSAS!

Most samosas are deep fried, I was trying to be a little healthier and I baked mine, still turned out crispy and wonderful!
 I made some veggie and some beef, I used the recipe for veggie filling found HERE, and modified it a little for the beef one also. I always found store bought beef samosas never had as good a flavour as veggie, I think a lack of strong spices maybe? Even though I used the same things in the beef samosas, we still liked the veggie ones best.
I made a TON of samosas for a family gathering, they were a hit!

We also brought along some muffins:
This is my knock-off version of a Timmies Fruit Explosion Muffin
I try to make different types of muffins every week for Kevin to have for breakfast or snack at work, I make mine with oatmeal so they are healthier and more filling.
I cheated with these muffins, I used the Quaker Oatmeal Muffin Mix
 then threw in a bag of "Antioxidant Rich" berries 
(cherries, strawberries, blackberries, blueberries and acai berries)
then topped the muffins with a slice of BC Gala Apples.
 I filled the centers with Strawberry Jam made by Kevin's Grandma. MMMmmmmm....

I made some simple Lemon-Poppyseed and Carrot-Pineapple muffins for an alternative for those who don't like berries (not sure who those people are, but they must not be related to me...). 

So tasty, and as easy as... well... muffins!

Happy Cooking and Baking!
-Courtney Soleil


Project Organization, Kitchen Pantry

I have had so much on the go lately (as usual), sometimes I feel like I work-eat-sleep, so little time for creativity - and with "Project Organization" on the go in my house, it's a little difficult to get everything done that I want to do... included in those things is sewing and posting projects more regularily.

Today since I have been cleaning instead of crafting, I wanted to share my first organizational hurdle with you, the kitchen pantry:


Sorry, I didn't get a "before" picture - by the time I decided I would post about it was when I was done. It turned out so much better than I expected - but just so you know it used to look sorta like this:


Ok, maybe not EXACTLY like that, but when I opened the pantry something always seemed to fall out. Basically the OLD pantry set up had only shelves and they were spaced wayyyyy too far apart.
It's no magazine piece, and I did it very inexpensively, but I am happy with it.

Kevin was great, he moved all the shelves up for me and changed the spacing so it would be more functional.

I bought this wire drawer caddy from Ikea (they had the same one at JYSK also) for around 30$, and for me that is kinda expensive (well, I can afford it, but I don't like to spend more than I need to). The caddy was pricey, but It just was the best choice for the application, and believe me I looked and LOOKED!

I just love to be able to see everything through the wire drawers from the front and be able to pull them open for quick access to all the goodies! I store potatoes in the bottom, then next up misc mixes, soups, bread crumbs etc, then baking supplies and finally on top ziploc bags, plastic wrap, parchment paper etc.

I am a firm believer that buying something for slightly less cost that doesn't work half as well is a waste, I would rather spend a little extra to have something that works perfectly for me (within reason of course, I am a frugal girl after all!), and this works perfect. 

Just as a Bonus, here is a peek at my beautiful kitchen window ledge:

Kevin put new windows and doors in our house last winter (he is SO AMAZING!) and I had always wanted a boxed out kitchen window - when I came home one night he had built it for me! I am so thrilled with it, every time I'm at my sink I am reminded how lucky I am.
My mum gave me these beautiful canisters, I love blue and yellow plus they match my kitchen.

Love it!!

Happy Organizing!
-Courtney Soleil