Monday, March 28, 2011

Samosas and Muffins!

I  had an excellent thifting day recently and in one of the $1.99 bags of random items was this brand new dough press:
So adorable, it even came with some recipe ideas

Just place a rolled piece of dough on each side, stuff with filling and smush closed.

You can make all kinds of things with this thing! Pizza pockets, pie pockets, and of course....
SAMOSAS!

Most samosas are deep fried, I was trying to be a little healthier and I baked mine, still turned out crispy and wonderful!
 I made some veggie and some beef, I used the recipe for veggie filling found HERE, and modified it a little for the beef one also. I always found store bought beef samosas never had as good a flavour as veggie, I think a lack of strong spices maybe? Even though I used the same things in the beef samosas, we still liked the veggie ones best.
I made a TON of samosas for a family gathering, they were a hit!

We also brought along some muffins:
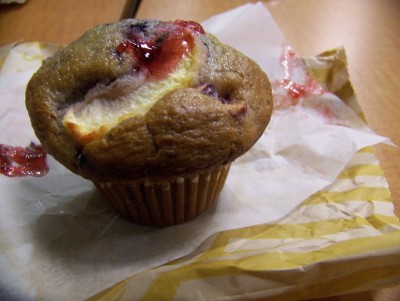
This is my knock-off version of a Timmies Fruit Explosion Muffin
I try to make different types of muffins every week for Kevin to have for breakfast or snack at work, I make mine with oatmeal so they are healthier and more filling.
I cheated with these muffins, I used the Quaker Oatmeal Muffin Mix
 then threw in a bag of "Antioxidant Rich" berries 
(cherries, strawberries, blackberries, blueberries and acai berries)
then topped the muffins with a slice of BC Gala Apples.
 I filled the centers with Strawberry Jam made by Kevin's Grandma. MMMmmmmm....

I made some simple Lemon-Poppyseed and Carrot-Pineapple muffins for an alternative for those who don't like berries (not sure who those people are, but they must not be related to me...). 

So tasty, and as easy as... well... muffins!

Happy Cooking and Baking!
-Courtney Soleil


Project Organization, Kitchen Pantry

I have had so much on the go lately (as usual), sometimes I feel like I work-eat-sleep, so little time for creativity - and with "Project Organization" on the go in my house, it's a little difficult to get everything done that I want to do... included in those things is sewing and posting projects more regularily.

Today since I have been cleaning instead of crafting, I wanted to share my first organizational hurdle with you, the kitchen pantry:


Sorry, I didn't get a "before" picture - by the time I decided I would post about it was when I was done. It turned out so much better than I expected - but just so you know it used to look sorta like this:


Ok, maybe not EXACTLY like that, but when I opened the pantry something always seemed to fall out. Basically the OLD pantry set up had only shelves and they were spaced wayyyyy too far apart.
It's no magazine piece, and I did it very inexpensively, but I am happy with it.

Kevin was great, he moved all the shelves up for me and changed the spacing so it would be more functional.

I bought this wire drawer caddy from Ikea (they had the same one at JYSK also) for around 30$, and for me that is kinda expensive (well, I can afford it, but I don't like to spend more than I need to). The caddy was pricey, but It just was the best choice for the application, and believe me I looked and LOOKED!

I just love to be able to see everything through the wire drawers from the front and be able to pull them open for quick access to all the goodies! I store potatoes in the bottom, then next up misc mixes, soups, bread crumbs etc, then baking supplies and finally on top ziploc bags, plastic wrap, parchment paper etc.

I am a firm believer that buying something for slightly less cost that doesn't work half as well is a waste, I would rather spend a little extra to have something that works perfectly for me (within reason of course, I am a frugal girl after all!), and this works perfect. 

Just as a Bonus, here is a peek at my beautiful kitchen window ledge:

Kevin put new windows and doors in our house last winter (he is SO AMAZING!) and I had always wanted a boxed out kitchen window - when I came home one night he had built it for me! I am so thrilled with it, every time I'm at my sink I am reminded how lucky I am.
My mum gave me these beautiful canisters, I love blue and yellow plus they match my kitchen.

Love it!!

Happy Organizing!
-Courtney Soleil


Sunday, March 13, 2011

Snu Love Apron

My first home made apron! I feel so accomplished finally getting it finished - I only worked on it intermittently between shifts at work, so I guess it didn't really take long, but I am glad to have it done!

I used the Nae-Nae Apron Tutorial at Craftiness is not optional and modified it to suit me better.
I love the fabric! Look at the cute hearts, thus the Snu Love Apron. Had to have blue, my favorite colour.

I made the ties long enough to be able to do a bow in front...
Or wrap around the front then tie it in the back....
I like to repurpose as much as possible, so I lined it with a vintage sheet I had on hand. 
I don't like ties for the neck strap because I always manage to get my hair tied in them, so I did some buttons to the side instead.
I love V-Neck, and it's a little better fit when you are big busted like me (ha ha).

I wasn't sure about pockets, but I think I will use them, and they are so girly. Ok, I used pleats all over the place, they are so pretty though!
I love the bow.

I actually bought another brighter turquoise and yellow floral fabric because I couldn't decide which I liked better - so another apron may be in my future!

Happy Sewing!
-Courtney Soleil

Tuesday, March 8, 2011

Whiteboard Crazy

Now that things are pretty much starting to get back to abnormal again, I have kind of made myself a BIG project to start, slowly at first... My plan is to organize and revitalize my house to the nth degree (on a budget), one room at a time. I decided my starting point will be the kitchen, since it's the most used room in the house - I have it so planned out now, that I even drew a picture of what will go where on the microwave stand. Our kitchen is lacking in storage space, so organization is key. I'm going to need baskets, home sewn dust covers, newly upholstered chair cushions and a whole lot of mental stability (seriously, every time I open my pantry something falls out and hits me).

To kick things off, I started with a more simple (less daunting) project - that desperately needed to be done. This is our whiteboard calendar BEFORE, it's always been the hub of our home -  and usually it hangs between the front entrance and the kitchen.
As you can see, it was really ugly a little worse off for ware...
Kevin had it since he was in college, and I don't think it ever had a frame, and after a few moves from BC to AB and back.... it got a little beat up.

I have thought I would spruce up the calendar just a little bit, and plus we needed another whiteboard for some kind for grocery list and dinner menu plans etc. So here is the finished product:
Please ignore the thermostat in the middle, ugly, it makes a great place to hide the dry-erase marker though.
To make the mini whiteboards, I put craft paper in the frame instead of a picture - this is not an original idea, I know, I have seen it all over craft land. 
Thought I'd mention, those frames were only 3$ at liquidation world! 
You'll remember yesterdays post, and on the shelf above the ribbon was a frame just like these? I thought I could use one in my craft room too.
For the calendar, I would have loved to build a frame with wood and paint it silver the same as the mini whiteboards, but I am still pretty timid with tools - not that I don't know how to use them but they are Kevin's, for work... maybe one day. Anyhoo, I used black bias binding with rick-rack over top to make it pretty, then craft paper at the top to match the mini whiteboards, the month is a removable piece of craft paper. Pretty and functional, LOVE IT!

Stay tuned for more posts about my house revitalization.

Happy Crafting!
-Courtney Soleil

Monday, March 7, 2011

Ribbon Organizing and Pattern Weights

You may remember my post about my Sewing Room where I showed off the pants hanger ribbon storage idea - but since I couldn't find a hanger with rungs spaces far enough apart, I couldn't fit all my ribbon! While my Mum was here, she suggested we get a wooden dowel and hang them on there some how between a shelf of in the closet.... we were brainstorming what we could do that would be functional in my room. and TADA!
I had this shelf up already (Kevin's handy work!) above my cutting/crafting table, and I picked up 2 inexpensive tension curtain rods from Walmart to fit between the braces under the shelf, perfect size for all my sewing ribbon (and room for many more...). It Also makes a great place to hang my tape measure (I am constantly losing that thing!) and my extension chord for my glue gun.

***Ohhhh and see that picture frame up there? I know you didn't even notice it until now were wondering "what is that???" There will be more on that tomorrow!!!***

I still use the pant hanger for all my craft ribbon (wired ribbon for flower arranging etc.) but I like to have these ones where I always have easy access to them. I can take each spool off one by one if need be, but I like to just roll off how ever much I need from where they are.

Every person has different needs of a ribbon organizer, and different space restrictions to consider. Some crafters need portability, others need to be able to grab each spool individually without any hassle. Some ribbon storage ideas are a little harder to duplicate because they are so unique, but if you know the right people.... You have to really think about what is going to work for YOU.

----------------------
Pattern Weights
I've had this project waiting to be posted since christmas for a while, but never got around to it... So here they are!! I wrapped the washers in dollar store ribbon (oh look at all the pretty colours!) and you can't lose these babies, no matter how cluttered your sewing room may be (heehee).
I originally saw the idea for this type of home made pattern weights  HERE, but I have been rediscovering similar ideas all over blog land. 

HERE and HERE are two more examples of the same Idea, except they also used nuts for their versions (I'll be making some of those soon too), where as the ones shown above are doubled up washers - cost me a whole 30 cents each from the hardware store. These are great, no more pinning! Definitely one of the most used items in my sewing room.


Happy Organizing!
-Courtney Soleil

Tuesday, March 1, 2011

NEW TOY! (Coming Soon...)

Ok, it hasn't arrived yet - but I have to post about it... I finally ordered a Silhouette SD!!

My beautiful cutting master machine should be arriving in a week or so (I am so excited when I talk about it I make that high-pitched excited scream noise and Kevin just laughs at me...). 
I haven't found a dealer in Canada yet (Michael's has never even heard of them...), but the Silhouette company does deliver to Canada - so if you have an extra 300$ kicking around you can go nab yourself one off their site, if not there are always promotions in blogland and on ebay (I never pay full price for anything...). I got a great deal on my new toy, I was looking around at U-Create - they had a promotion code to get a few extras (rolls of vinyl, heat transfer etc.) with the machine, plus I got the whole package for 225$! SAH-WEET!!!
I will post a review and pics of my few first trials once it arrives...

AND

You wanna blog that looks as pretty as your posts? Check out the giveaway by Blushink Templates hosted HERE at Tatertots & Jello.

Happy Cutting (and crafting)!!!
-Courtney Soleil